Image Preview in an HTML DIV from File Input
Table of Contents
Introduction
HTML is a standard markup language. It is used to design web pages. Web Developers use this language to develop attractive websites. HTML5 is a very commonly used platform for the web developers.
Previewing an image is important whenever you will ask your users to upload an image into your website. You need to show the preview of the image which is to be uploaded into the server. This preview can be taken in a div in a very simple way.
Here, we will use <input> tag with file value in type attribute. This will take input of images or any kinds of file from the local drive of the user. Then the URL will be build and the preview will be generated in a div. Thus a user can understand whether the image is getting uploaded in a proper manner or not.
In this case, we will use CSS for the styling purpose. CSS codes will be injected directly into the HTML document. Also for Client scripting, we will use JQUERY. To use JQUERY code into an HTML document, you will need to paste the CDN between <head> and </head> tags of the document. To get the CDN, you can visit here. Copy the minified CDN for the latest version and then paste it in the above mentioned space.
Use of Image Preview in Div
If you are asking your users to upload images, then they need to preview the image after selecting it for the purpose of verification. To do so, you need to avail the Preview option in your website. It will give a clarification to your works and your users will also be reliable.
Method of Creating Image Preview in Div
First of all, we need to design the HTML page by adding all the elements and styling them with the CSS codes. Styling will give the web page an attractive look. In this case, I am making a simple web page only with a heading, a div, an input file and a label for the input file. JQUERY CDN is added in the HTML5 document within <head> and </head> tags. The html code is given below –
<!DOCTYPE html>
<html>
<head>
	<title>Image Preview in HTML Div</title>
	<script src="https://code.jquery.com/jquery-3.6.0.min.js" integrity="sha256-/xUj+3OJU5yExlq6GSYGSHk7tPXikynS7ogEvDej/m4=" crossorigin="anonymous"></script>
</head>
<body>
	<center>
		<h2>Image Preview in HTML Div</h2>

		<div class="preview">

		</div>
		<input type="file" name="file" id="file" accept="image/*" style="display: none;">
		<label for="file" class="selImage">Select Image</label>
	</center>
</body>
</html>
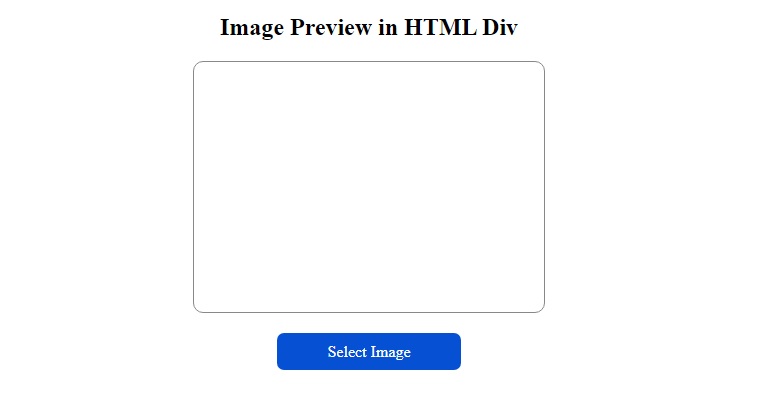
The HTML document will look like this –

The input file will accept only the image files. The input file control is set to invisible. It is not visible in the HTML5 document. For this reason, a label has been added to the page for the input file control. As a result, on clicking the label, file uploader dialog will open.
I have applied some simple styling on the div and the label of the input file control. It is giving a good look to the web page. The CSS code can be seen below –
<style type="text/css">
		.preview{
			display: flex;
			flex-direction: column;
			align-items: center;
			justify-content: center;
			width: 350px;
			height: 250px;
			margin-bottom: 30px;
			border: 1px solid #888;
			border-radius: 10px;
		}
		.selImage{
			border-radius: 7px;
			cursor: pointer;
			background: #0651d3;
			color: #fff;
			padding: 10px 50px 10px 50px;
		}
		.selImage:active{
			background: #0b367f;
		}
</style>
Now the scripting part. We will add JQUERY code before </body> tag. The JQUERY code is for selecting an image from the local drive and the image will be displayed in the div. The selected file URL will be created and it is set as the background of the said DIV of the HTML document. The view is set to 100% in height and 100% in width. So, it will cover the whole DIV and thus the whole image can be viewed. The JQUERY code is given below –
<script type="text/javascript">
		$(document).ready(function(){
			$('#file').change(function(event){
				var filePath = URL.createObjectURL(event.target.files[0]);
				document.getElementsByClassName("preview")[0].style.background = "url('" + filePath + "')";
				document.getElementsByClassName("preview")[0].style.backgroundSize = "100% 100%";
			});
		});
</script>
We have completed all the steps to carry the work. The overall code of the HTML document is given below –
<!DOCTYPE html>
<html>
<head>
	<title>Image Preview in HTML Div</title>
	<script src="https://code.jquery.com/jquery-3.6.0.min.js" integrity="sha256-/xUj+3OJU5yExlq6GSYGSHk7tPXikynS7ogEvDej/m4=" crossorigin="anonymous"></script>
	<style type="text/css">
		.preview{
			display: flex;
			flex-direction: column;
			align-items: center;
			justify-content: center;
			width: 350px;
			height: 250px;
			margin-bottom: 30px;
			border: 1px solid #888;
			border-radius: 10px;
		}
		.selImage{
			border-radius: 7px;
			cursor: pointer;
			background: #0651d3;
			color: #fff;
			padding: 10px 50px 10px 50px;
		}
		.selImage:active{
			background: #0b367f;
		}
	</style>
</head>
<body>
	<center>
		<h2>Image Preview in HTML Div</h2>

		<div class="preview">

		</div>
		<input type="file" name="file" id="file" accept="image/*" style="display: none;">
		<label for="file" class="selImage">Select Image</label>
	</center>

	<script type="text/javascript">
		$(document).ready(function(){
			$('#file').change(function(event){
				var filePath = URL.createObjectURL(event.target.files[0]);
				document.getElementsByClassName("preview")[0].style.background = "url('" + filePath + "')";
				document.getElementsByClassName("preview")[0].style.backgroundSize = "100% 100%";
			});
		});
	</script>
</body>
</html>
Conclusion
Image preview is very important for uploading images by the users in the server. In this tutorial, a very simple and easy process is discussed to carry out the job. In this process, the image can not be saved from the preview by the user. Such process of viewing images can be used in other parts of websites where you don’t let your users to download the image directly.
Thank you.
You Also can Read –
Custom Popup in HTML with JavaScript and CSS


